Optimizing Home Energy Monitoring with Growatt Shelly 1PM Gen3
Introduction
Home energy monitoring is an approachable, high-impact upgrade for any household. The Growatt Shelly 1PM Gen3 is a compact, affordable, and flexible relay plus power meter that lets you monitor and control a circuit while capturing real-time power and energy metrics. In this guide you’ll find step-by-step installation instructions, wiring diagrams (safety-first), firmware and networking tips, integration options with home automation platforms, common troubleshooting, and practical usage scenarios that help you get real value from the device.
This article is intended for people with basic DIY electrical skills. If you are not comfortable working inside an electrical panel, hire a licensed electrician. Always follow local codes and safety guidelines.
- What is the Shelly 1PM Gen3?
The Shelly 1PM Gen3 is a single-relay smart device with an integrated power monitoring sensor. It can switch loads up to its specified rating and measure voltage, current, and power on the switched circuit. Key features include:
- Small form factor suitable for DIN-rail or single-box installation
- Built-in power metering with real-time and aggregate energy reporting
- Local control via Wi‑Fi and MQTT
- REST and CoAP APIs for integrations
- Over-the-air updates and configurable web UI
Because it measures on the switched line, it’s particularly useful for monitoring dedicated circuits (water heaters, split ACs, washing machines, or specific lighting circuits). It provides actionable data for energy conservation and smart automation.
- Planning and safety
Before wiring or mounting the Shelly:
- Turn off and lock out the relevant breaker(s).
- Use an appropriate multimeter and verify voltage is removed before touching conductors.
- Confirm the rated current and switching capacity of your Shelly matches the load.
- Place the device in a dry, ventilated location. Avoid high-heat zones.
- Keep the neutral and live wiring organized; label wires if needed.
If you are unsure about any step, consult a qualified electrician. This guide is educational and does not replace professional electrical advice.
- Required tools and materials
- Phillips and flat-head screwdrivers
- Insulated wire strippers/cutters
- Multimeter
- Small terminal screws and connectors
- Heat-shrink tubing or terminal blocks as required
- DIN-rail or small electrical enclosure (if mounting inside panel)
- Wiring basics and diagrams
The Shelly 1PM Gen3 typically requires a live feed (L), neutral (N) for load sensing, and a switched output to the load. There are two common installation scenarios:
- Inline (single-pole) switching of a load where Shelly is in series with the live conductor.
- Metering on the switched load where the device reports the load’s current and calculates power.
Typical wiring steps:
- Identify the circuit’s live and neutral. Turn off power.
- Connect the device’s
Lterminal to the incoming live. - Connect
Nto neutral (if required by the Shelly variant you have). - Connect the switched output to the load’s live conductor.
- Ensure the load’s neutral remains continuous to the neutral bus.
- If using an external CT or a different metering configuration, follow the manufacturer’s wiring diagram.
Always secure connections and insulate exposed conductors.
- First boot, network setup, and firmware
After wiring and restoring power:
- The Shelly will usually broadcast a temporary Wi‑Fi access point on first boot. Connect a phone or laptop to that AP.
- Open the local web UI at the address the device advertises (commonly 192.168.33.1 or shown in the AP page).
- Use the guided setup to join your home Wi‑Fi network. Prefer 2.4 GHz networks for reliability.
- Update the firmware immediately if a newer release is available. Firmware updates include security fixes and improved measurement accuracy.
Tip: For robust setups, give the Shelly a static DHCP lease in your router or assign a fixed IP address. It makes integrations and troubleshooting easier.
Gen3 commissioning checkpoint
Before building automations, confirm that the device you actually installed is responding as a Shelly 1PM Gen3. Gen3 devices use the local Gen2+/Gen3 JSON-RPC API, so examples written for the original Gen1 REST API may use the wrong endpoints. From a browser on the same LAN, open the device’s local web interface and check that a status request such as /rpc/Switch.GetStatus?id=0 returns JSON. The apower value is the instantaneous reading; aenergy.total is cumulative energy. The exact fields and limits can change by model, so compare them with Shelly’s official 1PM Gen3 documentation before relying on an example.
Use a DHCP reservation or the device’s mDNS name (for example, shelly1pmg3-AABBCCDDEE.local) instead of hard-coding an address that can change after a router restart. Keep the device and your controller on the same reachable network, and start with 2.4 GHz Wi-Fi. If a local integration times out, check whether authentication has been enabled, whether ECO mode is delaying responses, and whether several systems are polling the device at once. For a first test, connect a known load, switch it on, and compare the local power reading with a reference meter. A zero reading can mean the load is bypassing the relay or that the relay is off; it is not automatically a failed sensor.
For terminal-by-terminal wiring, follow the manufacturer’s installation material and the rating printed for your exact unit. Do not infer that a Gen3 API example or a nominal 16 A rating makes every motor, heater, or consumer-unit installation safe. Panel work and high-inrush loads still require the correct protection, enclosure, derating, and—where applicable—a licensed electrician.
- Integration options
The Shelly 1PM Gen3 supports multiple ways to integrate with home automation systems:
- Shelly Cloud and the manufacturer’s app — quick setup and remote access via cloud.
- Local HTTP/JSON-RPC API — for simple queries and automations on the local network.
- MQTT — ideal for Home Assistant, Node-RED, and other automation systems prioritizing local control.
- Custom firmware (advanced) — for users wanting additional features or privacy.
Home Assistant integration example (MQTT)
- Enable MQTT on the Shelly: configure broker address, credentials, and topic prefix.
- In Home Assistant, add an MQTT integration and configure sensors and switches using the topic pattern created by the Shelly.
- Use the power and energy sensors to create dashboards, alerts, and smart automations (e.g., turn off circuits at high consumption).
Example automation ideas
- Schedule heavy-load devices to run during off-peak hours.
- Alert when a device draws unexpected standby power.
- Automatically cut power to a non-essential circuit if total household consumption exceeds a threshold.
- Measuring accuracy and calibration
Shelly devices provide good practical accuracy for household monitoring, but results depend on wiring and load characteristics. To improve accuracy:
- Ensure solid neutral and live connections; loose connections cause measurement jitter.
- Avoid splitting CTs or using shared neutrals that can confuse sensing.
- Compare readings with a trusted reference meter for calibration checks.
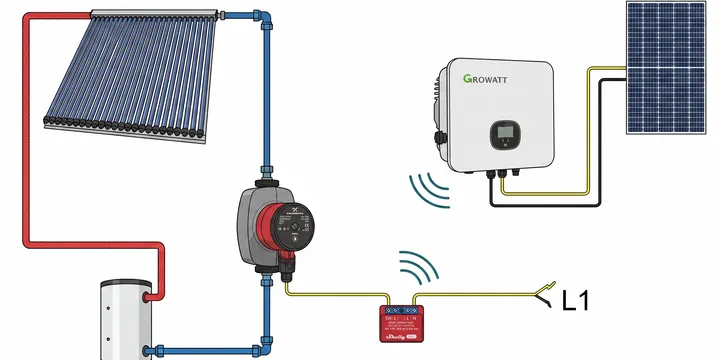
Common caveat: inductive loads (motors, pumps) can show transient currents that momentarily bias readings. Use rolling averages or filter these events in your dashboard for better user experience. If you plan to control a pump or motor from the Shelly, see our walkthrough of using a Growatt inverter reading to control a solar water heater pump — a complete threshold-based setup with fail-safe behavior.
- Advanced automations and energy management
With reliable metering in place, you can build automations that optimize energy use and reduce bills.
- Peak shaving: use battery storage or stagger loads to reduce peak demand.
- Demand response: integrate with utility pricing APIs (if available) and shift usage automatically.
- Energy dashboards: create visualizations of consumption per circuit to find inefficiencies.
Case study: Managing a hot water heater
Hot water tanks are great candidates for monitoring. By pairing a Shelly with a schedule and temperature sensor, you can:
-
Measure baseline tank draw and cycle efficiency.
-
Schedule heating during off-peak hours.
-
Temporarily disable heating when household consumption is high.
-
Troubleshooting
Problem: Shelly won’t join Wi‑Fi
- Verify SSID and passphrase. Confirm 2.4 GHz band is enabled on router.
- Check signal strength at the installation location. Consider a Wi‑Fi extender or moving device closer.
Problem: Inaccurate power readings
- Confirm wiring polarity and solid connections. Reboot after securing connections.
- Compare with a reference meter. Update firmware.
Problem: Device becomes unreachable intermittently
- Check router DHCP lease time and network congestion.
- Assign a static IP or a DHCP reservation.
- Privacy and security
Security checklist:
- Keep firmware updated.
- Use strong, unique passwords for local and cloud accounts.
- Prefer local MQTT/HTTP integrations rather than cloud for sensitive automation.
- Isolate IoT devices on a dedicated VLAN where possible.
- Maintenance and lifecycle
- Inspect connections yearly.
- Monitor firmware release notes for security advisories.
- Replace devices that show sensor drift or intermittent hardware faults.
- Practical tips and conclusions
- Start small: monitor one high-impact circuit first.
- Use dashboards to visualize return on investment — savings and convenience.
- Combine measurement with automation for maximum benefit.
Appendix: Quick checklist for installing Shelly 1PM Gen3
- Turn off mains and lock out breakers.
- Confirm device rating and circuit load.
- Wire L, N, and switched output per diagram.
- Power on, connect to AP, and configure Wi‑Fi.
- Update firmware and assign static IP.
- Integrate with Home Assistant/MQTT or use Shelly Cloud.
- Create automations and monitor performance.
References and further reading
- Manufacturer documentation and wiring diagrams
- Home Assistant Shelly integration docs
- Local electrical codes and safety guides
Final note
The Growatt Shelly 1PM Gen3 offers a balance of price, functionality, and flexibility that makes home energy monitoring approachable. With sensible installation and integrations, it becomes a powerful tool for saving energy, increasing awareness, and enabling smarter automation.
Extended reference and deep dives
Specifications and limits
Understanding the device limits is important before deployment. Typical specs for a Shelly 1PM Gen3-style device (consult the exact model sheet for your unit):
- Maximum switching current: 16 A (check model)
- Maximum switching voltage: 120–240 V AC depending on region
- Power metering resolution: often ~0.1 W–1 W depending on measurement method
- Connectivity: 2.4 GHz Wi‑Fi, optional MQTT/HTTP endpoints
Never exceed the device’s rated current; for heavy inductive loads such as compressors or motors, derate appropriately and consider using contactors controlled by the Shelly rather than switching the motor directly through the device.
Detailed wiring examples
Below are two practical wiring scenarios. These are illustrative — always follow official diagrams and local regulations.
Scenario A — Single-pole inline switching (typical lighting or heater)
Incoming mains -> [Shelly L] Shelly output -> Load
Wiring notes:
Lconnects to incoming live.O(output) goes to load live.Nconnects to neutral if required for the meter; some Shelly variants sense live-only.- Protect the circuit with appropriate overcurrent protection upstream.
Scenario B — DIN-rail inside consumer unit with multiple circuits
Place the Shelly near the relevant breaker, mount it on DIN-rail, and route the switched live through the device. Use short, neat wiring and secure terminals.
Power and energy calculations
Knowing how to interpret power and energy numbers will help you turn raw metrics into actionable insights.
- Instantaneous power: P (watts) = V (volts) × I (amps) × power factor (for AC, pf ≤ 1)
- Energy over time: E (kWh) = (∑ P(t) dt) / 1000 — integrate instantaneous power over time and divide by 1000 to get kilowatt-hours.
Example: If a device runs at an average of 1500 W for 2 hours:
E = 1500 W × 2 h / 1000 = 3.0 kWh
If electricity costs €0.25/kWh, cost = 3.0 × 0.25 = €0.75 for that usage window.
MQTT and topic examples
When configuring MQTT, use clear prefixes and retained messages for state. Example topic hierarchy for a Shelly with MQTT prefix home/shelly/garage_heater:
home/shelly/garage_heater/relay/0/command— publishon/offto switchhome/shelly/garage_heater/relay/0— current relay state (retained)home/shelly/garage_heater/emeter/0/power— instantaneous power in Whome/shelly/garage_heater/emeter/0/energy— cumulative energy in Wh
Sample payload handling
When you receive an MQTT message for emeter/0/power with payload 1205, interpret as 1205 W. Use streaming dashboards or timeseries DBs (InfluxDB, Prometheus + Grafana) to retain historic data.
Home Assistant integration (detailed)
Using MQTT discovery or manual configuration, expose the Shelly as sensors and switches in Home Assistant. Example configuration.yaml snippet (manual MQTT sensors):
switch:
  - platform: mqtt
    name: "Garage Heater"
    command_topic: "home/shelly/garage_heater/relay/0/command"
    state_topic: "home/shelly/garage_heater/relay/0"
    payload_on: "on"
    payload_off: "off"

sensor:
  - platform: mqtt
    name: "Garage Heater Power"
    state_topic: "home/shelly/garage_heater/emeter/0/power"
    unit_of_measurement: "W"
    value_template: "{{ value | float }}"

  - platform: mqtt
    name: "Garage Heater Energy"
    state_topic: "home/shelly/garage_heater/emeter/0/energy"
    unit_of_measurement: "Wh"
    value_template: "{{ (value | float) / 1000 }}"
Automation example: turn off when >2000 W household peak
alias: 'Throttle non-essential devices at peak'
trigger:
  - platform: numeric_state
    entity_id: sensor.house_total_power
    above: 2000
action:
  - service: mqtt.publish
    data:
      topic: "home/shelly/garage_heater/relay/0/command"
      payload: "off"
Node-RED flow outline
Node-RED is useful for quick visual automations. Basic flow:
- MQTT in node receives
emeter/0/powerupdates. - Function node computes rolling average or compares threshold.
- Switch node decides whether to publish
on/offtorelay/0/command.
Performance and scaling
If you plan many Shelly devices (>20), consider network segmentation and an MQTT broker on a reliable server. Keep firmware updated and monitor device reboots.
Custom firmware and privacy
Advanced users sometimes flash alternative firmware (e.g., Tasmota or ESPHome) to gain full local control and avoid cloud dependencies. Benefits:
- Full local control without manufacturer cloud
- Tight integration with Home Assistant via native protocols
- Potential for smaller attack surface if configured correctly
Drawbacks:
- Warranty voiding in some cases
- Need for more hands-on maintenance
Energy-saving projects and ROI
Here are practical projects and how to estimate savings:
Project: Smart scheduling of water heater
- Baseline: water heater uses 6 kWh/day (example)
- Implement scheduled heating to keep hot water available during high-demand windows and avoid peak rate periods.
- If optimized schedule reduces use by 15%, savings = 6 kWh/day × 0.15 = 0.9 kWh/day → ~27 kWh/month.
At €0.25/kWh, monthly savings ≈ €6.75. Balance this against device cost to compute payback period.
Case study: small household
A two-person household used Shelly devices on a water heater and washing machine. After automation and scheduling, they measured a 9% reduction in monthly energy usage, primarily from eliminating standby and shifting loads to off-peak. The non-recurring cost for two Shelly devices was recouped in under a year in that scenario.
Long-term monitoring and alerting
Store data in a time-series DB and create alerts for anomalies: sudden increases in standby, phantom loads, or device disconnects. Useful alert types:
- Power spike detection (>500% of baseline)
- Unusually long ON durations for devices normally run for short cycles
- Device offline notifications (no data for X minutes)
Regulatory and code considerations
Some installations (especially where modifications are made inside consumer units) may be subject to local building codes or require licensed electricians. In some regions, certain modifications void insurance if done incorrectly. When in doubt, consult local authorities or professionals.
Frequently asked questions (FAQ)
Q: Can I monitor whole-house power with Shelly 1PM? A: Shelly 1PM measures the circuit it is installed on; for whole-house monitoring you need a main CT (current transformer) on the incoming mains and a device rated for that purpose or a whole-house energy monitor.
Q: Can Shelly switch inductive loads like air conditioners? A: Technically yes within rating, but because motors have high inrush currents, it’s safer to control a contactor with the Shelly rather than switching the motor’s supply directly.
Q: How accurate is the Shelly’s energy metering? A: Good for practical monitoring, but not certified metrology-grade. For billing-level accuracy use certified meters.
Wrap-up
This extended guide aimed to provide not just installation steps but the context and examples needed to turn a single Shelly 1PM Gen3 into a meaningful part of a home energy strategy. With careful wiring, proper integration, and sensible automations, these devices deliver value far beyond simple remote on/off control.
Extended technical appendix
InfluxDB + Grafana example
Collecting and visualizing historical energy data lets you spot trends and validate automations. A common stack is MQTT → Telegraf → InfluxDB → Grafana. High-level steps:
- Configure Shelly to publish
emeter/0/powerandemeter/0/energyto your MQTT broker. - Run Telegraf with the MQTT consumer plugin and write to InfluxDB.
- Create a Grafana dashboard with panels for instantaneous power, daily energy, and rolling averages.
Example Telegraf MQTT consumer snippet (simplified):
[[inputs.mqtt_consumer]]
  servers = ["tcp://127.0.0.1:1883"]
  topics = ["home/shelly/+/emeter/+/power", "home/shelly/+/emeter/+/energy"]
  data_format = "value"
  data_type = "float"
Graph ideas
- Live power gauge (W)
- 24-hour energy bar chart (Wh per hour)
- Monthly cumulative energy (kWh)
Python ingestion example
For custom processing, a small Python script can subscribe to MQTT and write to a timeseries DB or CSV. Minimal example using paho-mqtt:
import paho.mqtt.client as mqtt
import csv
from datetime import datetime

def on_message(client, userdata, msg):
    with open('power_log.csv', 'a') as f:
        writer = csv.writer(f)
        writer.writerow([datetime.utcnow().isoformat(), msg.topic, msg.payload.decode()])

client = mqtt.Client()
client.on_message = on_message
client.connect('localhost', 1883)
client.subscribe('home/shelly/+/emeter/+/power')
client.loop_forever()
Testing and validation
Before trusting automations, perform controlled tests:
- Measure baseline consumption with the device in place but not automating switches.
- Run candidate automations in simulation or with low-stakes loads.
- Confirm energy reports roughly match a reference meter over a 24–72 hour window.
Hardware considerations and longevity
- Heat dissipation: dense DIN-rail layouts can cause higher ambient temperatures; ensure adequate ventilation.
- Connector integrity: periodically check screw terminals for loosening due to thermal cycling.
Vendor firmware vs. local-first setups
For most users, vendor firmware is convenient and adequate. For privacy-conscious or offline-first setups, use MQTT + local dashboards and consider avoiding cloud features or disabling cloud integration where feasible.
Final checklist (technical)
- Verify circuit rating and device limits.
- Securely mount the device and use proper terminal insulation.
- Assign static IP or DHCP reservation.
- Set up MQTT and retention policies for critical state topics.
- Establish backup and monitoring for your timeseries DB if used for billing or long-term analysis.
Acknowledgements and resources
- Shelly official docs and wiring diagrams
- Home Assistant integration guides
- MQTT, InfluxDB, Grafana documentation
Extra calibration and verification techniques
To gain confidence in your Shelly readings, run these quick verification tests:
- Resistive-load test: connect a known resistive load (an electric kettle with label power or an incandescent lamp) and compare measured power to the device rating. Resistive loads have a power factor close to 1, simplifying checks.
- Multi‑point sampling: measure at different known loads (e.g., 100 W lamp, 500 W heater, 1500 W kettle) and compare the percent error at each point.
- Long-duration drift test: log energy over 24–72 hours and compare cumulative energy to a calibrated reference meter if available.
Example: percent error = (measured − reference) / reference × 100%
If you see consistent offset error, apply a correction factor in your data pipeline (e.g., multiply readings by a calibration coefficient).
Operational recommendations
- Logging retention: keep high-frequency data (per-minute) for short periods (e.g., 48–72 hours) and downsample to hourly/daily aggregates for long-term storage to save space.
- Backup: export critical configuration (MQTT settings, static IP) and keep a copy of automation scripts off-device.
Community and next steps
Join community forums for Home Assistant, Shelly, and MQTT to learn from real-world deployments. Look for shared dashboards and automations to accelerate your setup.
Closing remarks
Deploying Shelly devices thoughtfully — with safety, good wiring practices, and robust data collection — turns small sensors into rich sources of insight about your home’s energy behavior. Use the examples here as a springboard for tailored automations and measurable savings.
Hero image: Wikideas1, CC0, via Wikimedia Commons.