- Growatt
- Shelly
- Home Automation
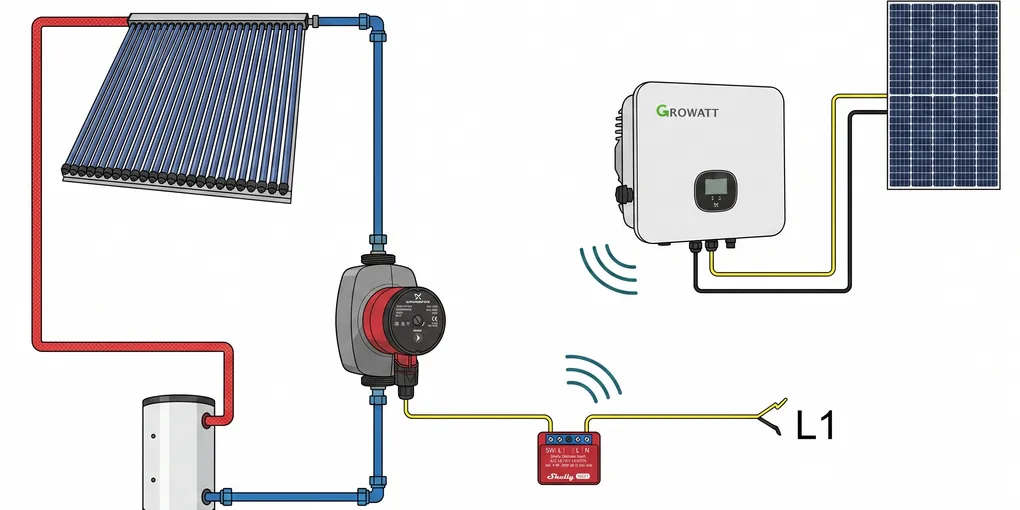
How to Control a Solar Water Heater Pump with Growatt and Shelly 1PM Gen3
If you want a solar-aware relay setup that reacts to live inverter output, a Growatt-to-Shelly bridge is a clean pattern. In my case, I am using it to control the pump for a solar water heater. The idea is simple: when the solar array is producing enough power, the pump can run and move heat through the water heater loop. When the available power drops below a threshold, the pump stops. If the API fails, the system falls back to ON so the relay does not get stuck in an unsafe or unavailable state.
This post is based on a compact Shelly script that polls the Growatt API every five minutes, stores the current wattage in a virtual component, and updates a Shelly 1PM Gen3 relay from the latest reading. The relay is not just switching a generic load. It is acting as the control point for the pump that circulates water through the solar thermal system, so the automation needs to be predictable, easy to inspect, and conservative when anything goes wrong.
Why Use Solar Production To Control A Water Heater Pump
The reason this approach works well is that the pump only needs to run when there is enough solar production available to justify it. A solar water heater pump is a good candidate for this kind of automation because it is usually a discretionary electrical load. It does not need to run constantly. It needs to run when the solar input and the thermal conditions are favorable.
If you already have a Growatt inverter or another source of live solar production data, you can use that value as a practical proxy for available surplus. It is not a perfect thermal model, but it is often good enough for deciding when the pump should run. That gives you a simple control rule that is easy to explain: when the panels are making enough power, the pump runs and transfers heat; when production drops, the pump turns off and avoids wasting energy or circulating lukewarm fluid.
That is especially useful for a solar water heater because the goal is not just to consume power. The goal is to move useful heat into the tank only when there is a reasonable chance of net gain. If the pump runs at the wrong time, you can lose heat instead of gaining it. A threshold-based control system helps reduce that risk.
The Core Control Strategy
The strategy has three parts:
- Read the current power value from Growatt.
- Compare it against a configurable watt threshold.
- Turn the Shelly relay ON when production is high enough, or OFF when it is not.
Because the relay drives the pump, the threshold becomes the point at which the pump is allowed to run. If the threshold is set too low, the pump may cycle on during weak production and move too little heat. If it is set too high, the pump may stay off longer than necessary and you may miss useful solar energy. The right value depends on the size of your array, the pump’s power draw, the thermal mass of the water heater, and how much thermal inertia your system has.
A separate fail-safe path keeps the relay ON if the HTTP request fails, the API returns an error, no device data is available, or the response cannot be parsed. That behavior is deliberate. In an automation context, it is better to keep the pump available than to leave the system in an unknown state after a temporary connectivity problem.
Example Script
The script below uses randomized-looking placeholder values for the token, serial number, and virtual handles. Replace them with your own values before deploying. The important part is the structure: a periodic API poll, a watt reading, a threshold comparison, and a fail-safe that keeps the pump circuit from becoming unresponsive.
// =============================
// Growatt -> Shelly 1PM Gen3
// Use case: control the pump for a solar water heater
// Logic: Power > Threshold = ON, Power < Threshold = OFF
// Safety: API Error = ON
// =============================

let wattG = Virtual.getHandle("number:247");
let diag = Virtual.getHandle("text:318");

let CONFIG = {
  token: "8n4k1qz7p2v9x6m3t5r8y0a1b4c6d7e",
  deviceSn: "RFH8CC90KQ",
  deviceType: "max",
  apiUrl: "https://openapi.growatt.com/v4/new-api/queryLastData",
  pollInterval: 300000, // 5 minutes
  thresholdWatt: 780,
};

let devID = Virtual.getHandle("text:219");
devID.setValue(CONFIG.deviceSn);

function setSwitch(state) {
  Shelly.call("Switch.Set", { id: 0, on: state }, function(res, err, msg) {
    if (err !== 0) {
      print("Relay Control Error: ", msg);
    }
  });
}

function getGrowattData() {
  updateVirtual(318, "Fetching...");

  let httpRequest = {
    url: CONFIG.apiUrl,
    method: "POST",
    headers: {
      "Content-Type": "application/x-www-form-urlencoded",
      token: CONFIG.token
    },
    body: "deviceSn=" + CONFIG.deviceSn + "&deviceType=" + CONFIG.deviceType
  };

  Shelly.call("HTTP.Request", httpRequest, function(result, error_code, error_message) {
    if (error_code !== 0) {
      diag.setValue("HTTP Err: " + error_code);
      setSwitch(true);
      return;
    }

    try {
      let response = JSON.parse(result.body);

      if (response.result !== 1 && response.code !== 0) {
        diag.setValue("API Err: " + (response.msg || response.message));
        setSwitch(true);
        return;
      }

      let data = response.data;
      if (data && data[CONFIG.deviceType] && data[CONFIG.deviceType].length > 0) {
        let device = data[CONFIG.deviceType][0];
        let power = Math.floor(device.pac || 0);

        wattG.setValue(power);
        diag.setValue("Updated: " + power + "W");

        if (power >= CONFIG.thresholdWatt) {
          setSwitch(true);
        } else {
          setSwitch(false);
        }
      } else {
        diag.setValue("No Device Data");
        setSwitch(true);
      }
    } catch (e) {
      diag.setValue("JSON Parse Err");
      setSwitch(true);
    }
  });
}

function updateVirtual(id, value) {
  let key = (typeof value === "number") ? "number" : "text";
  Shelly.call("Virtual.Set", {
    "key": key + ":" + id,
    "value": value
  });
}

Timer.set(CONFIG.pollInterval, true, function() {
  getGrowattData();
});

getGrowattData();
What The Script Is Doing
The script keeps two virtual values in sync. One is a numeric value that tracks the latest Growatt watt reading. The other is a text value that acts as a compact diagnostic display. That is useful when you are troubleshooting the installation because you can see whether the script is fetching data, whether the response was parsed, and whether the relay is being driven by actual solar production or by a safety fallback.
The watt reading is the central input. In this setup, the number does not represent a theoretical target. It represents the current real-world production level at the inverter. If that reading is high enough, the Shelly 1PM Gen3 is instructed to switch on the relay and allow the pump to run. If the reading is below the threshold, the relay is switched off and the pump stops.
For a solar water heater, that simplicity is a strength. The pump is usually there to transfer heat from the collector loop to the storage tank. There is no benefit in running it when the collector is underperforming. The controller does not need to know the temperature of every component to make a useful decision. It only needs a consistent production signal and a threshold that reflects the system’s real behavior.
Why The Pump Use Case Matters
Mentioning the pump is not just a cosmetic detail. It changes how you think about the automation. If the relay were driving a light or a general-purpose outlet, the cost of a wrong decision might just be inconvenience. But when the relay controls the pump for a solar water heater, the decision affects thermal performance.
If the pump starts too early, it may circulate cooler fluid and reduce the efficiency of the collector loop. If it starts too late, you may waste a window of useful solar production. The threshold therefore becomes part of the thermal strategy. The goal is to switch only when there is enough available solar energy to make circulation worthwhile.
That also means you should think about the pump’s electrical behavior. Many small circulation pumps have a modest but non-trivial startup current. If your relay, wiring, or circuit protection is marginal, the pump may behave differently at startup than it does while running steadily. A Shelly 1PM Gen3 is generally a good match for this kind of work, but only if the load is within its ratings and the installation is done correctly.
Choosing A Threshold For A Solar Water Heater Pump
The threshold is the most important tuning value in the whole setup. There is no single correct number, because the right value depends on your hardware and the weather pattern where you live. Still, there are a few sensible ways to choose it.
Start with the pump’s electrical rating. If the pump uses 60W, 80W, or 100W, that is not automatically the threshold. The threshold should usually be higher than the pump draw, because the controller needs enough margin to avoid chatter and to ensure that the solar system is genuinely producing surplus power. A threshold that is too close to the pump draw can cause frequent switching as production fluctuates.
Then consider the collector size and the tank size. A larger collector array can produce enough power earlier in the day and later into the afternoon, which means a lower threshold may still make sense. A small collector loop may need a more conservative threshold, especially if the weather is variable.
Finally, think about your tolerance for cycling. Some installations can handle frequent on/off changes, but a pump that starts too often may wear out faster. If that is a concern, you can raise the threshold, lengthen the poll interval, or later add hysteresis so the pump does not respond to tiny fluctuations.
Why Fail-Safe ON Is A Reasonable Choice
For this kind of automation, the fail-safe behavior is a policy decision. Here the script chooses ON when something goes wrong. That may sound counterintuitive if you think only in terms of electrical load, but it makes sense for a solar water heater pump in a recovery-oriented setup.
If the API is unavailable for a few minutes because of a network problem, you probably do not want the system to stop pumping solely because the controller lost visibility. In many solar thermal systems, continuing to circulate when the sun is strong is less risky than abruptly disabling circulation due to a temporary API issue. The code therefore treats HTTP errors, API errors, missing data, and parse failures as reasons to keep the relay on.
This does not mean fail-safe ON is always the right answer for every home automation project. It is the right answer here because the relay is being used as a practical controller for a thermal pump, not just as a convenience switch. The default should match the mode that keeps the system operational under uncertainty.
Virtual Components And Diagnostics
The script updates virtual components so you can inspect the system state without reading logs every time. One virtual value stores the current power in watts. Another stores a short diagnostic string such as “Fetching…”, “Updated: 1240W”, or “API Err: …”.
That matters because the actual behavior of the pump is shaped by more than just the relay state. You want a fast way to answer a few simple questions:
- Is the Growatt request succeeding?
- What wattage is the system seeing right now?
- Is the relay being switched because of the threshold or because of a fallback?
- Does the current reading make sense compared with the weather and time of day?
Those diagnostics are especially helpful during the first few days after deployment. You can verify that the control logic matches your expectations before you trust it to run unattended.
Practical Installation Notes
If the Shelly 1PM Gen3 is controlling the pump for the solar water heater, the electrical side deserves careful attention. The relay should be wired according to local electrical code, and the load should stay within the device limits. If the pump is an inductive load, check the startup characteristics rather than only the nominal running watts.
You should also think about what the pump does when the controller reboots. Because the script runs immediately on startup, the relay state will be re-evaluated as soon as the device comes back online. That is good, because it means the system does not sit idle waiting for the next poll interval. It also means you should be confident that the fail-safe choice matches your preferred default behavior.
Another practical point is access to the Shelly and Growatt endpoints. If your API token is invalid, if the inverter serial number is wrong, or if the device type does not match the actual inverter family, the script will never reach the data path. That is why the placeholder values in the code should be treated as examples only.
Suggested Operating Approach
When you first deploy the script, do not try to optimize it immediately. Start with a conservative threshold and observe how the pump behaves on sunny days, partly cloudy days, and during abrupt cloud changes. Watch the virtual diagnostics and compare them with the actual thermal result in the water heater tank.
If the pump is coming on too often, raise the threshold or increase the polling interval. If the pump is missing good solar windows, lower the threshold slightly. Try to change only one variable at a time so you can understand which parameter affected the result.
For a solar water heater, the real measure of success is not just whether the relay toggles correctly. It is whether the stored water temperature improves in a way that justifies the pump’s operation. Once the logic is stable, you can tune for comfort, energy efficiency, and equipment longevity.
Tuning Ideas After The First Version Works
Once the basic on/off logic is working, there are several useful refinements you can consider.
Hysteresis is the first improvement many people add. Instead of one threshold for both directions, you use a higher threshold to turn the pump on and a lower threshold to turn it off. That reduces switching when the solar production hovers around the boundary.
You can also extend the diagnostics. For example, you might record the last successful watt value, the relay state, or the last time the script received valid data. That can make the automation easier to audit later.
Another option is to align the pump control window with the time of day. If you know your collector never produces meaningful heat before a certain hour, you can avoid unnecessary polling and switching before sunrise. Likewise, if the collector is shaded late in the afternoon, you can stop checking earlier. That sort of scheduling is optional, but it can make the whole system quieter and more predictable.
Understanding The Five-Minute Poll Interval
The example uses a five-minute interval because it is a reasonable balance between responsiveness and API traffic. For a pump controller, you generally do not need second-by-second switching. Solar thermal systems change gradually enough that a few minutes of delay are usually acceptable.
If your pump and collector respond quickly to changes in sunlight, you may want a shorter interval. If the system is very stable and you want to minimize API calls, a longer interval may be fine. The key is to choose an interval that is slow enough to avoid unnecessary chatter but fast enough to catch meaningful changes in solar availability.
The interval also interacts with your threshold. A very aggressive threshold combined with a very short polling interval can produce a relay that feels nervous and overactive. A more conservative threshold with a moderate interval usually gives a calmer result.
Why The Script Uses The Current Inverter Output Rather Than Temperature
A common question is why this approach uses inverter output instead of direct temperature measurements. The short answer is convenience and availability. If the inverter already exposes a reliable data feed, you can build useful automation around that without adding more sensors immediately.
That said, inverter output is not the same thing as thermal collector performance. It is a proxy. It tells you how much electrical power the solar system is producing, which is often a decent stand-in for how much usable energy is available. For many household setups, that is enough to drive a pump in a sensible way.
If you later decide that temperature-based control would be better, you can still use the same basic architecture. The relay, diagnostics, and fail-safe structure can remain. Only the source of the decision changes. That is one reason this pattern is useful: it gives you a clean control scaffold that can grow with the system.
Safety And Maintenance
Whenever you control a pump from a smart relay, safety should remain part of the design. Make sure the hardware is installed in a proper enclosure, that the wiring is secure, and that any connected load is suitable for relay control. If the pump is part of a solar water heater loop with hot fluid, ensure that the circulation system also has the mechanical protections it needs.
Maintenance matters too. Check the system occasionally to confirm that the relay is still switching correctly, the API token is still valid, and the pump is behaving as expected. If the water heater is not reaching the temperatures you want, inspect both the control logic and the hydraulic system. Sometimes the issue is not the automation at all. It may be air in the loop, a failing pump, a blocked line, or a collector problem.
That is another advantage of keeping the code simple. When the control logic is easy to read, you can rule it out quickly during troubleshooting.
A Walkthrough Of The Logic Flow
Here is the same logic described in plain language.
At startup, the Shelly loads the script and immediately calls the Growatt API. The response is parsed, and the current power output is extracted from the inverter data. That number is stored in a virtual component so you can see it in the UI or other integrations. The script then compares the number with the configured threshold.
If the reading is at or above the threshold, the relay is turned on and the pump for the solar water heater is allowed to run. If the reading is below the threshold, the relay is turned off. If anything fails during the request or parsing process, the script turns the relay on rather than leaving the pump blocked by a temporary software issue.
The loop repeats every five minutes. Over time, that creates a lightweight automatic controller that follows solar availability without requiring constant manual intervention.
Common Mistakes To Avoid
One common mistake is copying the placeholder token and serial number into a live system. The values in the example are intentionally randomized-looking and should be replaced with real credentials and identifiers.
Another mistake is choosing a threshold based only on a guess. It is better to start from the pump’s power requirements and adjust from there after observing how the system behaves. A threshold that sounds reasonable on paper may not match the actual collector behavior on your roof.
It is also easy to forget that the pump is the real load being controlled. Because this post uses the solar water heater pump as the example, the relay state should be interpreted in that context. On means circulation is allowed. Off means the pump stops. That simple mapping should stay clear in your mind when testing and troubleshooting.
How To Get The Growatt API Token
The token field in the script must come from your Growatt account. The exact menu names can change over time, but the process is usually straightforward.
- Sign in to your Growatt account in the web portal.
- Open the account settings or developer/API area.
- Look for API access, Open API, or token management.
- Create a token if one does not exist, or copy the existing token.
- Confirm that your inverter is listed in the same account and note the exact serial number.
If you do not see API options in your account, your profile may not have API access enabled yet. In that case, contact Growatt support and ask for Open API access for your plant/account.
After you have the token, test it before putting it into the Shelly script:
- Use a REST client or command line request against the same endpoint used in the script.
- Send
deviceSnanddeviceTypein the request body. - Confirm that the response returns success and includes current inverter data.
Once that test works, paste the token into CONFIG.token, paste the exact inverter serial into CONFIG.deviceSn, and keep the token private. If you rotate or regenerate the token later, remember to update the Shelly script as well.
Final Example Values To Review Before Going Live
Before deploying, review these settings carefully:
token: your Growatt API token.deviceSn: your inverter serial number.deviceType: the correct Growatt family for your inverter.thresholdWatt: the watt level that should allow the pump to run.- Virtual handles: the numeric and text handles assigned in Shelly.
- Poll interval: how often the system checks the inverter.
If the relay is controlling the pump for a solar water heater, do one more sanity check after deployment. Watch one full sunny cycle if possible. Confirm that the pump comes on when production is strong, stays off when production is weak, and returns to the safe fallback state if the API becomes unavailable.
Summary
This pattern gives you a straightforward solar pump controller for a solar water heater: measure production, compare it to a threshold, and drive the Shelly relay with a fail-safe default. In my case, the relay is controlling the pump rather than a generic appliance, so the goal is to move heat only when the solar input is good enough to make the circulation worthwhile.
Because the script is simple, it is easy to inspect, tune, and maintain. Because it includes a fail-safe path, it keeps the pump from being stranded in an unknown state during temporary API problems. And because it uses a threshold, it gives you a practical way to tie solar production to real thermal use without adding a more complex control system on day one.